Firewalla Gold setup with Ubiquiti Dream Machine SE

I recently just setup a UNIFI systems in my home. My current setup is as follows:
Internet -> FW Gold (Router Mode) -> UDM SE -> All Devices
The issue I have with this setup is I cannot VPN in using Wireguard into my NAS. What is the proper setup for FWG with UNIFI?
-

Are you running UDM-SE in router mode as well?
If you want to keep both UDM and Firewalla, one other deployment is
ISP --> UDM-SE (router mode) -> Firewalla in Bridge mode -> All devices
There are limitations on the bridge mode, but it will avoid problems from multiple routers in your network. See https://help.firewalla.com/hc/en-us/articles/1500012304202-Firewalla-Transparent-Bridge-Mode
-

I had the same issue when I got my firewalla gold. I initially had it all setup in bridge mode but really wanted to use some of the other features not available in bridge mode. So after scouring the internets I found a solution. from Lawrence Systems. Since it is not possible to put the UDM into bridge mode and bypass its firewall or routing features this works to make the UDM think it’s at the top of the network when it’s really behind firewalla.
I have a few cameras, lights, doorbell and APs all in the UniFi ecosystem and wanted to keep all of that intact.
The solution I found to make it all work tricks the UDM into thinking it’s connecting to the WAN but then you give it an address inside your LAN.
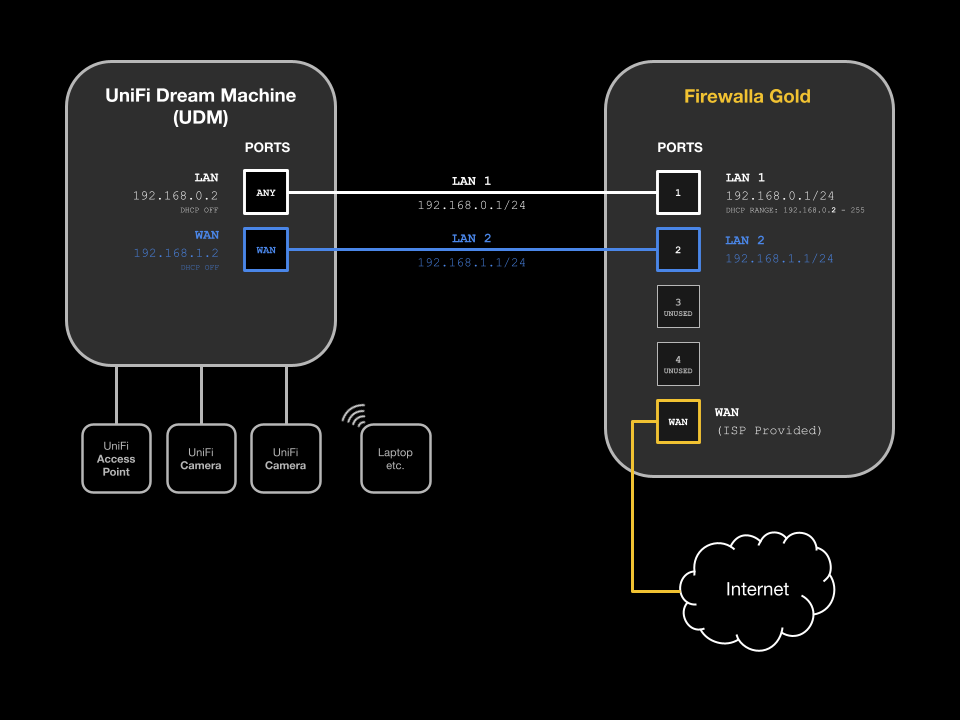
Basically you configure the firewalla to have two networks. LAN1 is the main network that all your devices live on and LAN2 is setup to give your UDM a dummy WAN connection on its WAN port. Without a connection to its WAN port the UDM will just complain that it needs a connection to the internet.
For LAN1 set the range of addresses from .2 -.254 (this is important and you’ll soon see why) plug the cable from firewalla for LAN1 into any other port other than the WAN ports on the UDM.
Setup LAN2 on firewalla and give it any IP range. Plug this cable into the firewalla on the proper port for LAN2 and into the UDM WAN port.
Then on the UDM you assign the gateway address (its IP address) to the .1 address that is not in firewallas LAN1 range (I told you it was important!) Also, on the UDM you need to turn off DHCP so firewalla is the only device handing out addresses on your network.
Your UDM will be happy it’s connected to the internet but will actually be operating on LAN1 so it can control your UniFi gear. It will also still be available over the internet for management because it has a connection via the WAN port.
This video does a way better job of explaining how to do this and was what worked for me.
https://www.youtube.com/watch?v=Omm2pQUJO0oHope that helps!
-

I was close to giving up integrating Firewalla properly into my setup, until I found this post, so, thank you owen.brown!
I spent a long time trying to find a solution to this challenge, and just discovered this post when looking for a solution to a different issue! Having fully implemented and tested this now, I can confirm it works perfectly, and so have provided detailed instructions/learnings below.
Please can someone at Firewalla incorporate these instructions and link them to the official docs for integrating with UDM?
For context, I was originally using DHCP mode, but was having a lot of performance issues. I contacted Firewalla for help but was advised that this solution had been deprecated and the only solution was to switch to Router Mode. Because I am using a Dream Wall, which has a built in switch and wireless AP, moving to Router Mode required that I connect the UDM to the Firewalla via the WAN port, and then to the Internet. While this enabled me to retain the filtering and firewall features, I lost most of my favourite Firewalla features, as managing individual devices was no longer possible, and everything in Firewalla appeared as one device (the Dream Wall). I also had quite a few routing and access issues with my smart home setup, which was instantly resolved when I implemented the solution below.
How the solution works
As previously described, this solution tricks the UDM into sitting on the same network as the Firewalla, by creating a dummy WAN connection. It is actually incredibly simple, and works effectively.
The UDM manages all UniFi devices (AP’s, cameras, sensors etc.), including how client devices connect to AP's in the network. This is where the UDM shines. The UDM no longer allocating IP’s or monitoring network traffic, and you lose the UDM firewall capability (replaced by Firewalla). This does mean that you need to keep the device names up to date in both UDM and Firewalla, but this only needs to be done once for each new device. It also means that sometimes UDM will not see some wired devices at all. Setting up UDM as a DHCP relay helps to reduce this.
Firewalla manages what devices can access what network, and what they can talk to, at a granular level. Firewalla’s combination of Network, Group, User, and Device level management and insights are brilliant, easy to use, and incomparable to complex and/or limited insights features offered by UniFi, despite many improvements in the last few months.
Instructions
This is a detailed and simple step-by-step guide to setting up your Firewalla as the Internet Router and DHCP server, with the UDM behind it, but still on the same network. The actual changes are very simple, but I have provided as much detail as possible to ensure this works first time!
Step 1: Preparation
- If you’re updating an existing network, allow at least a couple of hours, as things may go a little haywire initially, as your devices are reassigned from the UDM to the Firewalla network.
- Got to the UniFi device page, and client device pages in UDM, and cut and paste your existing DHCP assignments into a spreadsheet or text file. The UDM doesn't have an export function, and while it’s possible to do via ssh, unless you have massive network, having this text file as reference should be enough. The UDM will still remember its device assignments anyway (though not the IP address allocation), so that and text file, can be used to update Firewalla device assignments as it takes over.
- Do a backup of the UDM, just in case.
Step 2: Set up Firewalla
- Access Firewalla Dashboard:
- Connect your Firewalla device to your internet or modem.
- Log into the mobile Firewalla app.
- Configure Firewalla Networks:
- Go to “Network” at the bottom of the main screen.
- Create LAN 1 (Main Network):
- Create Network
- Local Network
- Name: LAN 1
- Choose a physical port e.g. Port 1
- Choose IP address range and subnet mask e.g.
- 192.168.0.1
- 255.255.255.0
- Choose an IP range for DHCP:
- 192.168.0.2 - This is very important, to ensure that the UDM is properly configured.
- 192.168.0.254
- All your devices (computers, cameras, etc.) will be moved to this network.
- Create LAN 2 (Dummy WAN Connection, required by UDM):
- This is the “magic” part, as the UDM won’t work unless it thinks it has a connection to the Internet via the WAN port.
- Create LAN 2 with a different IP range e.g.
- 192.168.1.1
- 255.255.255.0
- Choose a physical port e.g. Port 2
- Use the default IP range for DHCP
- This network will act as a dummy WAN connection for the UDM.
Step 3: Physically Connect the Devices
- Connect LAN 1 to UDM:
- Take the Ethernet cable from LAN 1 port on the Firewalla and plug it into any of the UDM’s LAN ports, except the WAN port.
- Connect LAN 2 to UDM WAN Port:
- Take another Ethernet cable and plug it from the LAN2 port on the Firewalla to the WAN port on the UDM.
Step 4: Configure the UDM
- Access UDM Dashboard:
- Log in to the UDM’s interface via the web browser or UniFi app.
- Disable UDM’s DHCP:
- In the UDM settings, go to the Network Settings
- Set the Default LAN network to the same as the Firewalla network e.g. 192.168.0.1/24
- Choose Manual, and set DHCP to none, to disable the DHCP server on the UDM.
- This is a critical step, to ensure that Firewalla is the only device handing out IP addresses on your network.
- Set Gateway and DHCP relay on UDM:
- Still in the UDM’s network settings, set the gateway IP address to the .1 address of LAN 1 on the Firewalla (e.g., 192.168.0.1).
- As above, the .1 address should be outside the DHCP range of your LAN 1 network (e.g. 192.168.0.2 – 192.168.0.254).
- Enable DHCP relay in network settings, set the source DHCP server to Firewalla (e.g. 192.168.0.1) - This helps to ensure that the UDM continues to see new devices that are issued an IP address by Firewalla.
- Reboot the UDM
- Rebooting the UDM should ensure that the new network setup is working.
- You might need to manually restart some of your AP’s for them to re-register properly.
- Test UDM Connection:
- The UDM will now believe it has internet connectivity, as it is plugged into LAN 2 (dummy WAN), but it is actually connected to LAN 1 for all practical purposes.
- As your devices switch over, you may find that some devices are still routing traffic through the WAN connection. You can wait, or remotely or physically restart those devices, to ensure they pick up the new config.
- If you’re using Firewalla’s Quarantine feature (I am), release all of the devices, and then go through and identify and group/update/remove devices later, to avoid any immediate network issues.
Step 5: Finalising the Setup
- Check Device Connectivity:
- Ensure that devices connected to LAN 1 (your computers, cameras, etc.) are functioning correctly and can communicate with each other.
- Also, verify that the UDM can access the internet through the Firewalla (it should be working fine since the UDM is getting its gateway from Firewalla’s LAN 1 network).
- Manage UDM Devices:
- Since the UDM is connected to LAN 1 and is receiving its WAN connection from LAN 2, it will still have internet access and function as the network controller for your UniFi devices (APs, cameras, etc.).
- You can manage your UniFi devices from the UDM’s dashboard as usual.
- Enforcing all routing through Firewalla:
- This is not required, but once everything seems to be working, to ensure that ALL traffic goes via the Firewalla, you can add static route to UDM:
- UDM does not allow you to set the destination as 0.0.0.0/0 (every address on the Internet), so setup two static routes, which splits the ranges in two, as follows:
- Name: "Route all Internet traffic through Firewalla LAN 1"
- Next Hop: Firewalla router IP e.g. 192.168.0.1
- Distance: 1
- Destination for static routes: 0.0.0.0/1 and 128.0.0.0/1
Troubleshooting Tips:
- No internet access on UDM: Ensure the UDM’s gateway is set correctly to the .1 address in Firewalla's LAN 1.
- Device connectivity issues: Double-check that the DHCP server is disabled on UDM and that all devices are connected to Firewalla’s LAN 1 network.
-
Check cables: Ensure that LAN 1 is plugged into a LAN port on UDM (not the WAN port) and that LAN 2 is plugged into the WAN port.
-

@Fusedelements
Thanks for sharing the details. And it's great it works.
Just want to call out that in this setup, all devices are still using Firewalla Gold as main router, and UDM is like a standalone device providing Unifi Controller function.
Internet --> Firewalla --> Unifi DM
                       --> Unifi APs
                       --> Other devices
To me, the only concern is UDM is too overkill for this setup... the Unifi Controller software or the Cloud Key would be a better alternative.
-
@Bmbarnard, correct, that is how it is configured. See the diagram above.
@Support Team, I agree, many of the great features on the UDM (which have also improved significantly since) are sadly no longer available. Unfortunately, to benefit from some of the best Firewalla features, this is the only viable option. While I appreciate that in some areas these are competing platforms, it would be great to have a configuration option on the Firewalla to improve the feature integration, and benefit from the best features on both platforms. I also use UniFi Protect extensively (doorbell, cameras, sensors), which is not part of Firewalla’s product range and relies heavily on the UDM system to function. The config above means I can use both systems without issue.
I recently identified one relatively big issue with this setup. As the UDM is no longer issuing IP addresses, many of the wired devices have become invisible to the UDM. I have accepted the loss of many of the UDM security and routing features, but this can be a real pain when trying to troubleshoot issues. I was able to improve this significantly by configuring the UDM as a DHCP relay, which is an additional but important step. It’s relatively straightforward, but I will try to add it to the instructions above, when I can.
-

Thanks Fusedelements. I saw that in the diagram and tried it, I'm also using the DHCP Relay setting.
Thanks again for this thread, I was having trouble getting my config to work and this saved me.
I have younger kids using the local network and the Firewalla's features are a must have for me to monitor contro and protect internet use.
I'm running the following:
Firewalla Gold SE:
-> Unifi Express 7 Lan (Lan 1)
-> Unifi Express 7 Wan (Lan 2)
-> Unifi 16 Port Switch (Lan 1)
-> Unifi AP's -
Bmbarnard, very glad it helped, and thanks again to owen.brown for the original post!
I originally bought the Firewalla Gold for the same reason (protecting and managing family access). This current setup, since moving away from the original DHCP mode, has continued to worked really well, and Firewalla's continued improvements, such as Active Protect, has made it even better.

Please sign in to leave a comment.
Comments
9 comments